Wednesday, March 27, 2013

Yet Another Quad Tree Tutorial

There was nothing to show for Screenshot Saturday this week, but that doesn't mean there hasn't been any progress! I spent the weekend writing a quad-tree implementation and integrating it into the existing engine. It was not a very hard process, and there are already dozens of tutorials available online for this, but this guide may still come in handy for someone.

How Do Quad Trees Work

You may be familiar with a binary tree. Essentially there's a "root" structure (known as a "node") that branches out into two nodes (binary = two). Then, each of these nodes splits into two of their own. This continues as long as necessary. The nodes that aren't split are called "leaf" nodes.
Quad trees work exactly the same way, except the nodes are split into four parts rather than two. This is useful for video games because the screen is a rectangle, and can thus easily be split into smaller subsequent rectangles. Here's a screenshot of a stress-test quad tree in progress:


The small, 8x8 quads represent particles with physics. Each quad you see can contain a maximum of 32 (an arbitrary value) particles before it automatically splits into 4 nodes. The tree cannot go more than 6 levels deep, though, because that would eventually cause a stack overflow due to the recursion inherent to quad trees.

You can see this live, in-action by downloading a demo here (pardon the dependencies, I used my old wrapper classes to write this). Hold keys to generate particles, or use the mouse to set them in certain locations. Right-click the mouse to test for a collision with the large blue quad. The result will show up in the console window as a 1 (true) or 0 (false). You can notice that the operation is performed incredibly quickly, even with an insane amount of particles on the screen. That is the power of a quad tree.

Note: If you get DLL errors, you may need to install the VC++ redistributable from here.

Friday, March 15, 2013

Blurring The Line

This week, I've got some minor updates done. With midterms and projects across the board, it's been a pretty insane week, and not much progress has been made on the game visually. Behind the scenes, I've got some code-restructuring, and the beginnings of an enemy class. On the visual side of things, I've got a new game-play mechanic to show off!

While tweaking the time-trail algorithm, I realized that a particularly clever player could stand in a very bright area for an extended period of time to cast himself further into the future, then just skip throughout the level unnoticed by enemies while his past self slowly trudged through the layers of time. As I wondered about how to fix this, I realized that I had a couple of Gaussian blur shaders already implemented for when I was testing post-processing in my rendering engine. So I decided to test what it would be like if the player was faced with an increasing blur of the world around him as he traversed through time.

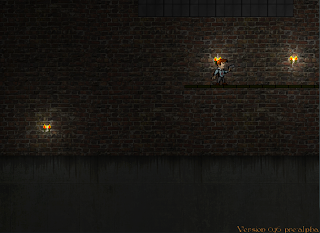
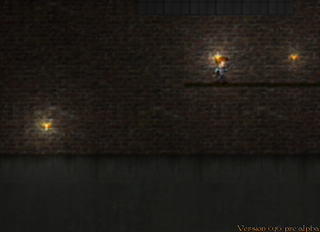
Here are a couple of screenshots showing the differences:
A small delay, ~1 second A much larger one, ~10 seconds


The idea is that the player will not be able to accurately see what's going on in the level as the blur increases, and thus will be deterred from traveling a large amount into the future.

Algorithm Details

For the time-trail algorithm, I created a method called CWorld::CalculateLightInfluence(). It, aptly named, calculates the sum of the three most-influential light sources. It used to rely on distance, but that only makes sense if all of the lights have the same attributes, so now the actual influence is calculated and compared for all of the lights. The calculation is as follows:

distance * 200.f / (Constant Attenuation + Linear Attenuation * distance + Quadratic Attenuation * distance2) * brightness

This is almost the same as the algorithm I use in my lighting shader, except it's done on a single light rather than every pixel of the entire screen, heh. I can easily tweak the 200.f constant if I want lights to have more or less of a cumulative influence. So, this value is summed, capped at a range of [0, 5), and returned to the world for further processing.

Back in CWorld::Update(), this value is then used to create time-trail instances. After this, the blurring algorithm is performed. It determines the total time between the current time and the time-trail active at the moment. This represents the amount of time ahead the player is. This value is divided by 10000, because the Gaussian Blur shader only works well with really small radius values. It's clamped to [0, 1/300]. The larger the value, the closer it is to the limit, and thus the blur increases!

I want to tweak this to be a progressive algorithm, rather than just a linear increase. In the near future, I'll make a spread-sheet and maybe apply a increase based on a stretched out x2 graph, like maybe x2/8


Saturday, March 9, 2013

More Menu Magic

Some small, but beautiful updates this week!
The GUI keeps on improving, with new menus and transitions! I've added an options menu with functioning toggles, a credits menu with full recognition, a transition sound effect, a critical audio bug fix, and some updates to the player-trail algorithm!

Check out the screenshots below:

Friday, March 1, 2013

Making a Menu

I've been a bit quiet the past few weeks on here, but I've been actively participating in Screenshot Saturday on /r/gamedev. You can see last weeks here, and the one prior here.

This week, I've worked on creating a flexible, slick UI system for making menus. It proved to be pretty complex, and I used a seriously ass-backwards technique to get it accomplished.
You can think of a button as an physical entity, right? You need to be able to check collision, move it around for transitions, and swap textures easily. So I created a CButton class with a CEntity inside. At first, I just had a button texture rendered to the screen as a mesh, and the text rendered on top without being a part of the scene. This worked okay, but I wouldn't be able to add shader effects to the text portion of the buttons, which would look weird. So I had to have them both be a part of the scene.